The TimeTraveler installation program restarts Windows Explorer and opens an
Explorer window with your Documents folder. At this point, Explorer is
configured to load the TimeTraveler Timeline automatically. You can change this
behavior on the General Tab of the configuration window.
The "business end" of TimeTraveler is its timeline, populated with time
markers called points-in-time. Each point-in-time represents a file system
snapshot for the explored drive. If the Explorer address is not referring to a
fixed and local drive, TimeTraveler is not loaded. Similarly, TimeTraveler is
not loaded for removable storage like CDs or DVDs, and for shared folders hosted
by a remote machine. Snapshots which represent points-in-time are generated by
Microsoft Volume Shadow Copy service. The timeline in its initial state ranges
from the time of the first snapshot to the current time. The timeline is
updated periodically and will display any newly created or deleted snapshots.
You can trust TimeTraveler to accurately reflect the state of the explored
drive. Further, the timeline offers a rich set of information and functionality.
Figure 1: TimeTraveler components
TimeTraveler OverviewTimeTraveler Overview
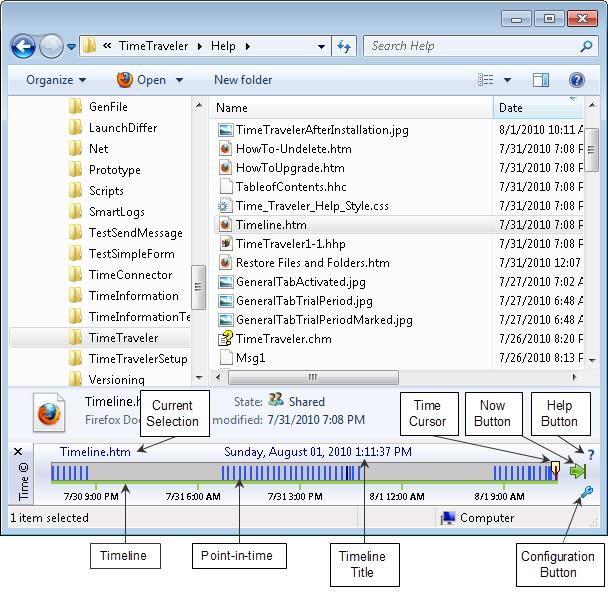
You can time travel by moving the time cursor to a point-in-time. When
TimeTraveler starts, it is set at the current time as indicated by the timeline
Title and the Time Cursor pointing to the rightmost time marker: the purple
one. The timeline and its title are updated frequently to display the current
time and reposition the timer markers on the timeline. When the time cursor is
set at current time, Windows Explorer displays the file system as it normally
does when TimeTraveler is not present. Figure 1 shows Explorer at the current
time. The address bar is set to:
F:\work\BOTL\TimeTraveler\Help
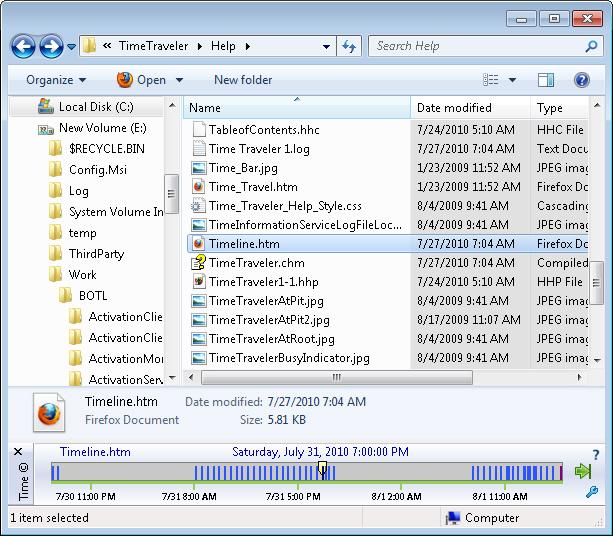
Moving the Time Cursor to a point-in-time causes TimeTraveler to display the
file system as it was at the time indicated by that tick on the Timeline. The
Timeline Title is changed to display the selected time and the path in the
Explorer address bar is changed to refer to the current folder at the selected
time. The changed path in figure 2 is:
This path can be deciphered as follows: The turquoise portion is a folder
created by TimeTraveler that serves as a mount point for shadow copies, or
points-in-time. The yellow portion is a folder created to host sub-folders
for the explored drive. The pink portion is a folder named after the GMT time
of the point-in-time. Finally the green portion is the path being explored.
From there, you are browsing the file system exactly as it was at the selected
point-in-time as long as you stay within the folder
C:\BearsOnTheLoose\F$\@GMT-2009.07.28-02.00.01. Note that if the current folder
does not exist at time you select, Explorer will be set to the closest ancestor
that existed prior to that time.
When TimeTraveler is set on a point-in-time, the timeline title is fixed and
only non-modifying operations are allowed on the files and folders. This is
because the shadow copies are inherently read-only. You can't rewrite your
history! However, you can use all the read-only operations provided by Windows
Explorer and its adds-on, including Search. This makes TimeTraveler very
powerful. Also notice in figure 2 that the right hand side of Windows Explorer
has a gray background when navigating the history. This gives the user a visual
clue that he or she is not looking at the current state of the file
system.
Figure 2: TimeTraveler at a point-in-time
TimeTraveler OverviewTimeTraveler Overview
Just above the timeline, on the left, the name of the Explorer
selection is displayed. It is the list view (Explorer right hand side)
selection if it exists or the folder view (Explorer left hand side) selection
otherwise.
To the right of the timeline are the "now" and the configuration
buttons. The former can be used to travel back to the current time when
navigating the history. Pressing the latter brings up the Configuration form.
Using this form and its graphical view of your storage, you can configure the
storage associated with your shadow copies. You can also create, delete and
schedule point-in-time creation. This form is explained in detail in the Configuration page.
If you point at a time tick and press the right mouse button a
short menu appears. It allows you to either: 1) Restore Windows 2) Restore a
file or a folder 3) Compare the Explorer selection with the current time, or 4)
Select the point for comparison with another time. You can see a full
explanation of these actions in the "How To" section of Help.